Saturday 19 July 2014

Beaded bra straps

Please excuse the picture of my underwear but i'm quite proud of it!
The shape of the back of my wedding dress means that you can see a portion of my bar straps. Since going without any support is not an option i decided that if you can see them i'd better make them pretty!

 
So i used the little bag of spare beads you get with embellished dresses and embellished the part of the bra straps that you'll see. Now they look like theyre supposed to be there - hidden in plain sight!

Wednesday 16 July 2014

Seating plan

This definitely means the wedding is nearly here - the seating plan is now fixed!
I just bought some purple mountboard, printed the tables and occupants on some coloured card and fixed them in place with some lovely lacey washi tape i found on ebay
Then i just embellished it with some dried lavender - to keep it in line with the theme!
Its all very real now!!! :)

Monday 14 July 2014

Emergency kits

Ive put together some emergency kits for the wedding. This one is for the guest and us, it'll be in the toilets at the reception.
Deodrant (mens and womens), suntan lotion, hand wipes, chewing gum, dental floss, hand gel, insect repellent, moisturiser, hairspray, hair grips.

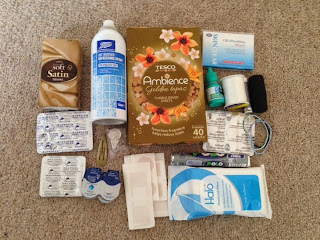
Then i'll have my own emergency kit, for me and lovely BM, just in case.
Iussues, cooling spray, static wipes, oil absorbing sheets, eyedrops, thread (white, grey and black), ibuprofen, paracetamol, hair clip, needle, spare contact lenses, plasters (various sizes), deowipes, mints, antihistamines, hair bands.

Hopefully that covers everything!

Thursday 10 July 2014

Bleach 'dyed' bride tshirt

Ive seen a few of these bleached bride tshirts on the interweb so i thought id make my own to wear on the wedding morning


I just used a clorex bleach pen i bought off ebay. If you use one make sure you shake it well first and use it on a test piece first to get rid of the air bubbles - my B is a bit messy because of air bubbles.

Monday 7 July 2014

Wedding Chalkboard


As our guests are arriving at our venue before us i thought id do a cute little blackboard letting them know the plan!

Friday 4 July 2014

Center pieces - lace and string jars, bottles and cans


Centerpieces are well underway! I de-labelled a lot of cans, jars and bottles, wrapped them in lace trim (fixed with a glue gun) and then wrapped the lace with purple garden twine (a little bit of glue on the knot fixed it in place). I'll arrange them on the tables and fill them with lavender the day before the big day!!

Sunday 29 June 2014

Wedding prep!

The spare room is gradually filling with wedding shaped items!!! Squeee!!

Sunday 22 June 2014

Imagination!

Can you see the cat in the wood grain?
How about now?
Lovely BM thinks im a crazy person but i love my imagined cat!!

Saturday 14 June 2014

Bottle (or jar) label removal

As im DIYing a lot of the wedding and trying to keep costs down ive been hoarding glass bottles and jars to use in centerpieces and various other stuff. This has led to me having to remove a lot of labels from these bottle and jars. Theres a lot of tips and tricks on the interweb about the best way to do this but i thought i would share my best way of doing it. Although the pics are of a wine bottle the same works on jars etc too

This is the wine bottle im using as a demo, a very nice red valpolicello that lovely BM is partial to!
First off i score the label, some labels have a shiny coating and scoring it lets the water penetrate and makes it quicker to remove

Next get your scored label good and wet. Then you can scrape the top layer of the label off. I alternate between a finger nail and the abrasive side of a washing up sponge. Really youre only trying to get the top papery layer off the label. They will definitely be glue and some of the label left after this step.

Once the top layer is off its time to pull out the big guns! WD40 is one of my favourite things ever (it shines up stainless steel like nothing else!) and its great for getting glue and residue off stuff. Liberally apply it to the label remnants, allow it to soak in and then scrape off a much as you can. Again a finger nail or washing up sponge works well.

If youre lucky the glue will come off as well at this stage and you can just wash your bottle with soap and water. But often theres a residue left on the bottle from the glue.

To take this off i use acetone nail varnish remover. Put some on a cotton wool pad or some tissue and rub the glue residue until its all gone. For particularly stubborn residue you can lay acteone soaked cotton wool over the residue and then wrap it in clingfilm (stops the acetone evaporating) and leave the acetone to work its magic.

Then you can wash your bottle with some soap and water to remove any of the WD40 and acetone.

Hopefully after all these steps you'll have a lovely label and glue free wine bottle (or jar)!

Thursday 12 June 2014

Chocolate wedding cakes make


Wedding cake number 2 (chocolate) is made - eek!
Only six weeks to go now so my blogging might be a bit sporadic from now on!